


Recently my Freeview (UK) TV signal started to break up, mostly in the evenings and for hours on end. Bad pixellation, odd bits of sound, and unwatchable. The aerial was in the loft, with a masthead amplifier and the setup had worked perfectly for years. I tried a few checks: Changed the ‘universal’ aerial to a more specific Group A. Tried a mains interference suppressor both on the TV and PVR supply and on the masthead amplifier supply. Tried a 4G filter on the co-

I’m not an aerial or TV expert. Everything here has been learnt from internet reading and I’m writing about it here as it worked for me.

Found a lot of useful information on www.satcure.co.uk . Dish alignment information is here: www.dishpointer.com and look for satellite ASTRA 2.
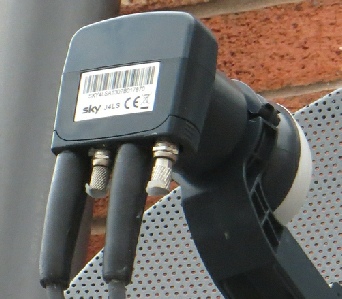
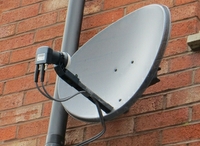
I wanted to be able to record, pause etc. so I needed two cables from dish to satellite box. 20m of double (shotgun) satellite cable WF100, clips, F plugs cost about £50 while a dish, brackets, LNB and signal meter from Amazon cost about £40. My dish LNB has 4 sockets so I have 2 spare.
I routed the cable through the house from the front dish to the rear TV in the lounge and so I got white cable which doesn’t show very much. Most of the route was at ceiling height within a garage and utility rooms so nominally out of sight. This cable won’t take any tight bends and so had to allow for sweeping curves along the route. Got some long drills (60cm -
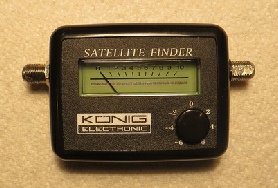
The LNB detector needs a power supply to operate and this is provided by the satellite box. So the signal meter needs to be connected to the dish AND the satellite box, not just the dish. As the cable carries a voltage (12/18V) all connections must be made with the satellite box OFF and disconnected from the mains to avoid shorts and damage to electronics.

It’s recommended to have NO joints in the cable as this can lead to signal losses. I used F plugs of the screw-
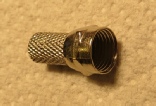
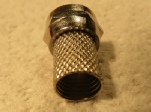
I bought the F plugs with the cable and the tolerance was deliberately tight. The F plug makes contact with the outer screening braid of the cable, while the inner cable conductor acts as the signal pin. All of this information came from the excellent website of www.satcure.co.uk
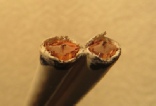

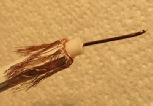
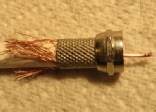
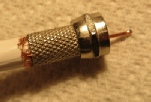
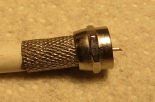
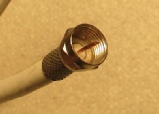

Remove about 2cm of outer plastic insulation, bend the shielding braid BACK over the outer, cut off the copper foil and bare the inner signal-
This is hard and you need SILICONE GREASE to lubricate and keep the weather out. You screw the plug on until the inner foam dielectric is just located in the F plug hole and the inner wire pokes out. TIP: If you stop screwing with about 2mm to go, you can cut off the excess copper braid and the ends are hidden when you complete the screwing! The inner signal wire acts as the plug male component. There's a temptation to cut this so it's longish, around 4mm. I did this at first and it's WRONG. It means that the wire stops the plug going into the socket and you can't screw the nut on properly. The inner wire needs to be proud of the F plug but by only 2mm or so, so that you can screw the F plug onto its socket properly. (11mm spanner but with great care and restraint!) Fill the F plug with silcone grease before connecting to keep the weather out. Similarly silicone grease on any unused LNB sockets for the same reason.
ALIGNMENT
I pointed the dish in approximately the right direction, side-
The satellite box went through its installation routine and showed a GOOD signal! Success.
(I now have a Humax Freeview PVR box and a Humax Freesat box. The remote controls interfered. If you turn off the PVR, and, using the Freesat remote, press 0 (zero) and OK simultaneously for about 5 seconds, you get a screen message that says ‘mode 1, press any numerical key 1-
Finally I painted the exterior white cable matt grey to help camouflage it.